







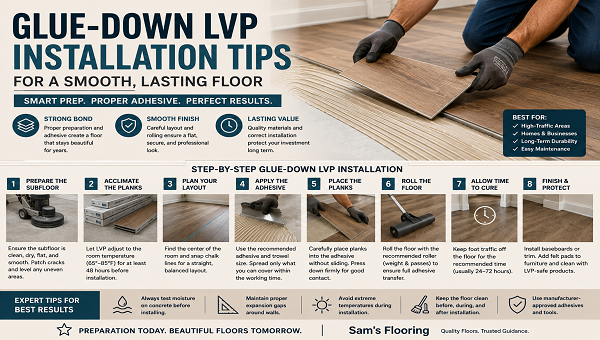
A well installed vinyl floor can provide comfort, style, and dependable performance for many years. However, the finished result depends on much more than arranging attractive planks across a room. At Sam’s Flooring, we know that careful preparation, correct adhesive use, accurate layout planning, and patient installation all affect the final surface. For homes and commercial spaces in the United States, glue-down luxury vinyl plank can be a practical choice because it creates a stable floor that feels firm underfoot and works well in busy areas.
Begin With the Right Glue-Down Vinyl Product
Before installation starts, homeowners should choose a product that suits the room, traffic level, subfloor, and design plan. Quality glue down luxury vinyl plank comes in many wood-look colors, plank sizes, thicknesses, and wear-layer options. Therefore, comparing more than appearance can help prevent performance problems later.
A bedroom may not need the same wear layer as a busy entryway, retail space, or family room. Likewise, a kitchen may require a product that handles spills and frequent cleaning more comfortably. As a result, the selected flooring should match the way the room will be used every day.
The adhesive must also match the flooring product and subfloor. Manufacturers may approve different adhesives for concrete, plywood, or other prepared surfaces. Therefore, installers should review the technical instructions before opening the first carton.
Key Takeaways
- Subfloor preparation is the most important part of a successful glue-down installation because every dip, ridge, crack, or piece of debris can affect the finished surface.
- Correct adhesive coverage and working time help prevent loose edges, bubbles, movement, and uneven bonding.
- Careful layout planning, rolling, and curing protect the floor and help it remain smooth under daily use.
Understand How Glue-Down Flooring Works
Glue down flooring attaches each vinyl plank directly to the prepared subfloor. Instead of locking the planks together as a floating system, the installer spreads an approved adhesive and places every piece into the bonding area. This direct attachment creates a firm feel underfoot. In addition, the planks usually produce less movement than a floating floor when people walk across them. Glue-down installation can work well in large rooms, connected spaces, commercial interiors, and high-traffic areas. However, the system depends heavily on the condition of the surface below it. A floating floor may cover small imperfections more easily because it sits over an underlayment. Glue-down vinyl, however, follows the shape of the subfloor closely. Therefore, poor preparation may lead to visible lines, raised areas, gaps, or loose sections.
Compare the Main Installation Factors
The table below shows how each stage affects the finished floor.
| Installation factor | Why it matters | Problems caused by poor work |
| Subfloor flatness | Gives every plank full support | Visible dips, ridges, movement, and uneven seams |
| Surface cleanliness | Helps adhesive bond properly | Loose planks, bubbles, and lifting edges |
| Moisture testing | Confirms whether the base is suitable | Adhesive failure, staining, odor, and floor damage |
| Layout planning | Creates balanced plank placement | Narrow cuts, uneven rows, and awkward transitions |
| Adhesive selection | Matches the product and subfloor | Weak bonding or damaged flooring |
| Open and working time | Controls when planks should be placed | Sliding planks or poor adhesion |
| Rolling the floor | Transfers adhesive across the plank back | Empty areas and loose corners |
| Curing time | Allows the bond to strengthen | Movement, gaps, and displaced planks |
Each step supports the next one. Therefore, installers should not rush the early stages to reach the visible flooring work more quickly.
Inspect the Subfloor Before Installation
A smooth installation begins with a detailed subfloor inspection. The base must be flat, clean, dry, solid, and suitable for the selected adhesive. Installers should remove old adhesive residue, paint, drywall compound, dust, oil, grease, and loose material. Even a small piece of debris can create a bump beneath a flexible vinyl plank. The installer should also check for movement. Loose plywood panels, damaged sections, weak seams, or unstable areas must be repaired before flooring goes down. In addition, the surface should be checked with a long straightedge. High spots may need grinding or sanding, while low areas may need a suitable patching or leveling product. The goal is not only to make the floor look level. Instead, the goal is to create a flat surface that supports every plank evenly.
Do Not Skip Floor Preparation
Floor preparation often takes longer than laying the vinyl itself. However, this time is not wasted. A carefully prepared subfloor makes plank placement faster and helps the adhesive form a stronger bond. In contrast, a rough surface can slow the installer because every row requires extra adjustment. Preparation may include scraping, vacuuming, grinding, patching cracks, filling joints, applying primer, or using a leveling compound. The exact steps depend on the surface and product requirements. For installations in the United States, local building conditions may vary from dry concrete slabs to older plywood subfloors. Therefore, the preparation plan should match the actual property rather than follow one general method.
Test Concrete for Moisture
Concrete may look dry while still holding moisture inside it. Therefore, visual inspection alone cannot confirm whether the slab is ready. Moisture can interfere with adhesive performance. It may also lead to staining, odor, loose planks, or damage beneath the flooring. Installers should use the testing method required by the flooring and adhesive manufacturers. In addition, they should record the results before continuing. If the test shows excessive moisture, the problem should be addressed with an approved system. Simply applying more adhesive will not solve the condition. New concrete also needs enough time to cure. However, time alone does not guarantee that moisture levels are acceptable. Testing remains essential.
Prepare Plywood and Wood Subfloors Carefully
Wood subfloors need a different review. The panels should feel secure and should not move, squeak, or flex excessively. Loose sections should be fastened properly before further preparation begins. Seams, fastener holes, and surface damage may also need filling with a compatible patching product. However, the patch must dry and be smoothed before adhesive is applied. Some wood products may not provide a suitable direct-bonding surface. Therefore, an approved underlayment panel may be required. Installers should also check crawl spaces or areas below the floor. Poor ventilation or moisture below the subfloor can affect the installation above it.
Allow the Flooring to Reach Room Conditions
Flooring materials and adhesive should be stored according to manufacturer instructions before installation. The room should also reach the recommended temperature and humidity range. Heating and cooling systems may need to operate before, during, and after the project. Planks that remain too cold may become stiff and harder to place. Meanwhile, extreme heat may affect adhesive working time. Cartons should be stored flat and protected from moisture. In addition, installers should avoid placing them directly over heating vents or intense sunlight. Proper conditioning helps the material remain stable while it is being cut, placed, and rolled.
Plan the Direction of the Planks
Plank direction influences how the room looks. Running planks along the longest wall can make a narrow room feel longer. Meanwhile, following natural light may reduce the visibility of seams in some spaces. However, the layout should also consider hallways, doorways, islands, cabinets, and transitions between rooms. A continuous installation through several areas requires more planning than one square bedroom. Therefore, installers should create reference lines before spreading adhesive. A dry layout can reveal narrow cuts along walls or awkward pieces near doorways. If the last row becomes extremely thin, the starting row can be adjusted to create a more balanced result.
Establish Straight Reference Lines
Walls are not always perfectly straight. Therefore, beginning directly against one wall can cause the rows to drift. Installers should measure the room and create straight chalk lines or other reference marks. These lines help keep the planks aligned as the installation moves across the floor. The first rows require special care because they guide every row that follows. A small error at the beginning may become much more visible across a large room. Therefore, installers should measure again after placing several planks. Early corrections are easier than removing a large completed section.
Mix Planks From Several Cartons
Vinyl planks may include color and pattern variation. Therefore, using one carton at a time can create noticeable groups across the floor. Installers should open several cartons and mix planks during placement. This method creates a more natural distribution of shades and printed grain patterns. Repeating designs should also be separated when possible. Placing identical wood knots or grain marks beside each other can make the surface look artificial. Before applying adhesive, installers can arrange a small selection of planks and review the overall mix. This simple step can improve the visual result without adding major cost or installation time.
Use the Correct Trowel
The trowel controls how much adhesive reaches the subfloor. A notch that is too small may not provide enough coverage. However, a notch that is too large may spread excess adhesive and create mess around the seams. The adhesive manufacturer normally lists the correct trowel type and notch size. Therefore, installers should follow that requirement rather than selecting a familiar tool without checking. Trowels also wear during use. As the notches become smaller, adhesive coverage may change. For larger projects, installers should inspect the trowel regularly and replace it when needed.
Respect Adhesive Open Time
Some adhesives require a short waiting period after spreading. Others allow immediate placement or support both wet-set and pressure-sensitive methods. Therefore, installers must understand the adhesive’s open time and working time. Placing planks too early may cause movement or adhesive transfer through the seams. In contrast, waiting too long may prevent the planks from bonding properly. Room temperature, humidity, air movement, and subfloor porosity can affect drying speed. As a result, installers should watch the adhesive itself rather than relying only on a timer. Adhesive should be spread across an area that can be covered within the approved working period. Spreading across the entire room at once can create problems if the installer cannot place planks quickly enough.
Avoid Spreading Too Much Adhesive
Working in manageable sections helps keep the installation controlled. The installer can spread adhesive, allow the correct waiting period, place the planks, check alignment, and move to the next section. Large adhesive areas may dry unevenly. In addition, installers may need to step across the coated surface, which can leave marks or reduce coverage. A smaller work area also allows faster correction if a row begins to move out of alignment. Therefore, steady progress usually creates a better result than rushing to cover the room quickly.
Place Every Plank Carefully
Each plank should be lowered into position rather than slid through wet adhesive. Sliding may push adhesive toward the seams or leave an empty area beneath one edge. Therefore, installers should align the plank and press it down evenly. The ends and sides should fit according to product instructions. Some glue-down products require tight seams, while others may use specific spacing. Installers should check the plank surface as they work. Adhesive on the face should be removed using the approved method before it cures. Strong chemicals should not be used unless the manufacturer permits them. An unsuitable cleaner may damage the finish or leave a dull mark.
Stagger End Joints for a Natural Look
End joints should not line up in one repeating pattern. A proper stagger improves the visual flow and prevents the floor from looking like a grid. It also avoids placing several short seams close together. Installers can use cut pieces to begin later rows when the remaining plank length meets product requirements. However, very short pieces should be avoided near walls, doors, and other busy sections. The exact stagger may vary by product. Therefore, installers should check the installation guide before cutting the first row.
Make Accurate Cuts Around Walls and Doorways
Careful cutting gives the floor a professional appearance. Straight wall cuts may be simple, but door frames, cabinets, vents, pipes, and irregular corners require more attention. Installers should measure each opening and allow the required perimeter space. Templates can help with complex shapes. Door casings may be undercut so the plank slides beneath them. This method can create a cleaner appearance than cutting around the full profile. However, structural parts of the doorway should not be cut without understanding their purpose. Sharp blades also matter. A dull blade can tear the vinyl edge or produce rough cuts.
Roll the Floor at the Required Time
Rolling helps transfer adhesive across the back of each plank. A floor roller applies pressure more evenly than walking over the surface. Therefore, it can reduce empty spots and loose edges. The required roller weight and timing depend on the flooring and adhesive instructions. Some systems may require rolling soon after placement and again later. Edges, corners, and difficult areas may also need hand rolling. Skipping this step can leave sections without full adhesive contact. Those areas may lift or sound different underfoot after the floor enters regular use.
Keep Traffic Off the New Floor
The adhesive needs time to cure. Walking, moving furniture, rolling appliances, or cleaning too early may shift planks and weaken the bond. Therefore, installers should block the room and follow the stated curing period. Heavy appliances require extra care because small wheels or feet can place strong pressure on limited areas. Protective boards may be needed when appliances are moved back into position. Furniture should be lifted rather than dragged. In addition, felt pads or suitable protectors can reduce future scratches. The floor should not be wet-cleaned until the adhesive has cured and the manufacturer allows it.
Check Transitions and Edges
Transitions connect the vinyl with carpet, tile, hardwood, or other nearby floors. These pieces should protect the exposed edge and create a safe change between surfaces. However, transition strips should not create unnecessary pressure that prevents the vinyl from sitting flat. Perimeter edges may also require baseboards or shoe molding. These trim pieces cover the required space while creating a finished appearance. Trim should be attached to the wall or suitable base rather than trapping the flooring incorrectly. Accurate edge work helps the project look complete and protects the floor in busy doorways.
Work With a Knowledgeable Flooring Source
Product selection, adhesive compatibility, subfloor requirements, and installation instructions all affect the project. Experienced Flooring Stores can help homeowners compare product specifications before materials are ordered. This guidance can be especially useful when the project includes concrete, high traffic, connected rooms, or unusual site conditions. Homeowners should ask about the approved adhesive, trowel size, moisture limits, wear layer, cleaning instructions, and warranty requirements. They should also order enough extra material for cuts, waste, pattern selection, and possible future repairs. A small amount of stored matching flooring can make later plank replacement easier, especially when colors or collections change.
Protect the Floor After Installation
Regular care helps preserve the surface. Loose dirt and grit should be removed with a soft broom, microfiber mop, or suitable vacuum. Grit can scratch the wear layer when it becomes trapped beneath shoes or furniture. Spills should also be cleaned quickly. Although vinyl handles moisture better than many wood materials, liquid should not remain around seams, walls, cabinets, or transitions. Furniture pads can reduce pressure and scratches. Meanwhile, entry mats can catch dirt before it travels across the room. However, mats and pads should use materials approved for vinyl flooring. Some rubber-backed products may react with the surface and cause discoloration.
Common Problems Usually Begin Below the Surface
Visible flooring issues often start with preparation or adhesive mistakes. A raised line may come from a subfloor joint. A hollow section may result from weak adhesive transfer. Gaps may appear when planks move before the adhesive cures. Likewise, lifting edges may come from dust, moisture, incorrect trowel coverage, or missed rolling. Therefore, repairing only the visible plank may not solve the real problem. The installer should identify why the bond failed before replacing the section. This is another reason careful preparation matters. The work hidden below the flooring often determines how the finished surface performs.
Final Thoughts
A smooth and lasting glue down flooring installation begins before the first plank touches the floor. Subfloor inspection, moisture testing, patching, cleaning, layout planning, adhesive selection, and room conditioning all protect the final result. During installation, we recommend working in controlled sections, following the adhesive timing, keeping rows straight, mixing planks from several cartons, and rolling the floor thoroughly. Afterward, the adhesive should cure fully before normal traffic, furniture, appliances, or wet cleaning returns. For flooring projects in the United States, conditions can vary widely between concrete slabs, plywood subfloors, dry regions, humid areas, and older homes. Therefore, the installation method should follow the selected product and actual site conditions. When preparation and placement receive equal attention, glue-down LVP can create a stable, attractive, and comfortable floor that supports everyday use for many years.